
AI Clouds and their role in the AI era
And a hands-on project: Mistral-7B powered chatbot on Nebius AI Cloud

👋 I am Aurimas. I write the SwirlAI Newsletter with the goal of presenting complicated Data related concepts in a simple and easy-to-digest way. My mission is to help You UpSkill and keep You updated on the latest news in GenAI, MLOps, Data Engineering, Machine Learning and overall Data space.
With the rise of AI, a new breed of Cloud that specifically offers GPU optimised resources has emerged. It is no surprise as the demand for GPUs has soared. We call them - AI Clouds. In this article you will find:
An overview of the role of AI Cloud in the age of AI.
A hands-on project where you will:
Set up a Kubernetes cluster on AI Cloud
Deploy an open source LLM (Mistral-7B-Instruct) from HuggingFace using vLLM server on Kubernetes.
Build a simple Streamlit based chatbot that uses the previously deployed model endpoint.
Expose all of this externally so that you can access the chatbot via your browser.
Here is a high level diagram:

If you do run into any problems while following the project, let me know in the comment section or drop me a PM, we will solve it together.
This newsletter episode is sponsored by Nebius - an emerging AI Cloud provider. They are currently running a campaign, offering substantial discounts on the first 1000 GPU hours for NVIDIA® H100 Tensor Core GPU instances with a price point of 1.5 USD/GPU hour.

You should consider registering if you want to take advantage of the offer. Also, you will need an account if you want to follow the hands-on project that follows later in the article.
What are AI Clouds and when you might consider using one?
As mentioned at the beginning of the article, AI Clouds are specifically offering GPU optimised resources, usually with advanced performance configurations so that a user can spin up integrated GPU nodes with ease. There has always been a debate if you should simply use a third party LLM API providers like OpenAI/Anthropic or an AI Cloud like Nebius to serve your own open source models for inference purposes. Let’s look into the cons and pros of both.
The LLM application lifecycle has evolved to be complex in the past few years. We went from pre-training of foundation models and then finetuning them for alignment, to building simple RAG (Retrieval Augmented Generation) systems on top of them and eventually evolving them to complex agentic systems capable of more advanced automation.

If you are training your own foundation LLM or aligning it to human preference, there is no escape from needing a GPU cluster, no proprietary model provider will help you here. Unless you are one of the largest companies on the planet that train foundation models, building your own physical GPU clusters is too capital expensive and out of the question, AI Clouds will help you here in getting competitive prices for interconnected and optimised GPU resources. For a startup that is trying to break into frontier model development it might be the only way of getting the opportunity to play in the game.
When it comes to finetuning of the models, some of the largest model providers have finetuning functionality on top of their frontier models, but that increases the cost of inferencing even more and adds additional level of “black box” on the resulting model. For some low traffic/volume use cases this might be just enough. However, if you are serious about the product you are building with LLMs, you might consider finetuning an open source model like Llama 3.1 and serve the resulting model on an AI Cloud.
The interesting part of LLM application lifecycle to analyse when choosing between proprietary model APIs and deploying in AI Clouds is when you are building AI powered systems like RAG or Agents, where inference is key. The choice might not always be obvious there. Let’s delve deeper.
The TCO of LLM inference.
One would argue, that deploying and maintaining your own LLMs on an AI Cloud could be a challenge and brings it’s own additional cost, and that is true. The added cost however is usually fixed and linearly increasing with the amount of GPUs you will need. If you are running distributed workloads, the additional cost of operation (usually human labour) on top of pure GPU costs might be continuously decreasing when divided per GPU operated. Remember, that we are talking about managed GPU clusters and not building your own racks.
Before evaluating costs of using proprietary model APIs vs. hosting your own LLMs on an AI Cloud, you want to consider viability for your application to run on an open source model in the first place. Nowadays it is usually a valid option as open source models are catching up with frontier models quickly, also RAG or agentic applications do not require extremely powerful model in a wide sense as they are using the models as a reasoning/planning engines rather than a system that can answer any question by default. We can usually do well with smaller but more task focused models. The bellow text assumes that you have estimated the viability of using open source models.
TCO (total cost of ownership) is an important measure that eventually should drive your decision of running with proprietary LLM APIs or serving your own model on AI Cloud. When we think of the cost of proprietary LLM APIs it is all about input and output tokens. The good thing about these APIs is that we will always (assuming that the API does not go down and you have a paid plan with high enough quotas) be able to get our inference results and the volume can be easily scaled down to zero. The curve of cost over time fluctuates with the traffic to your application.
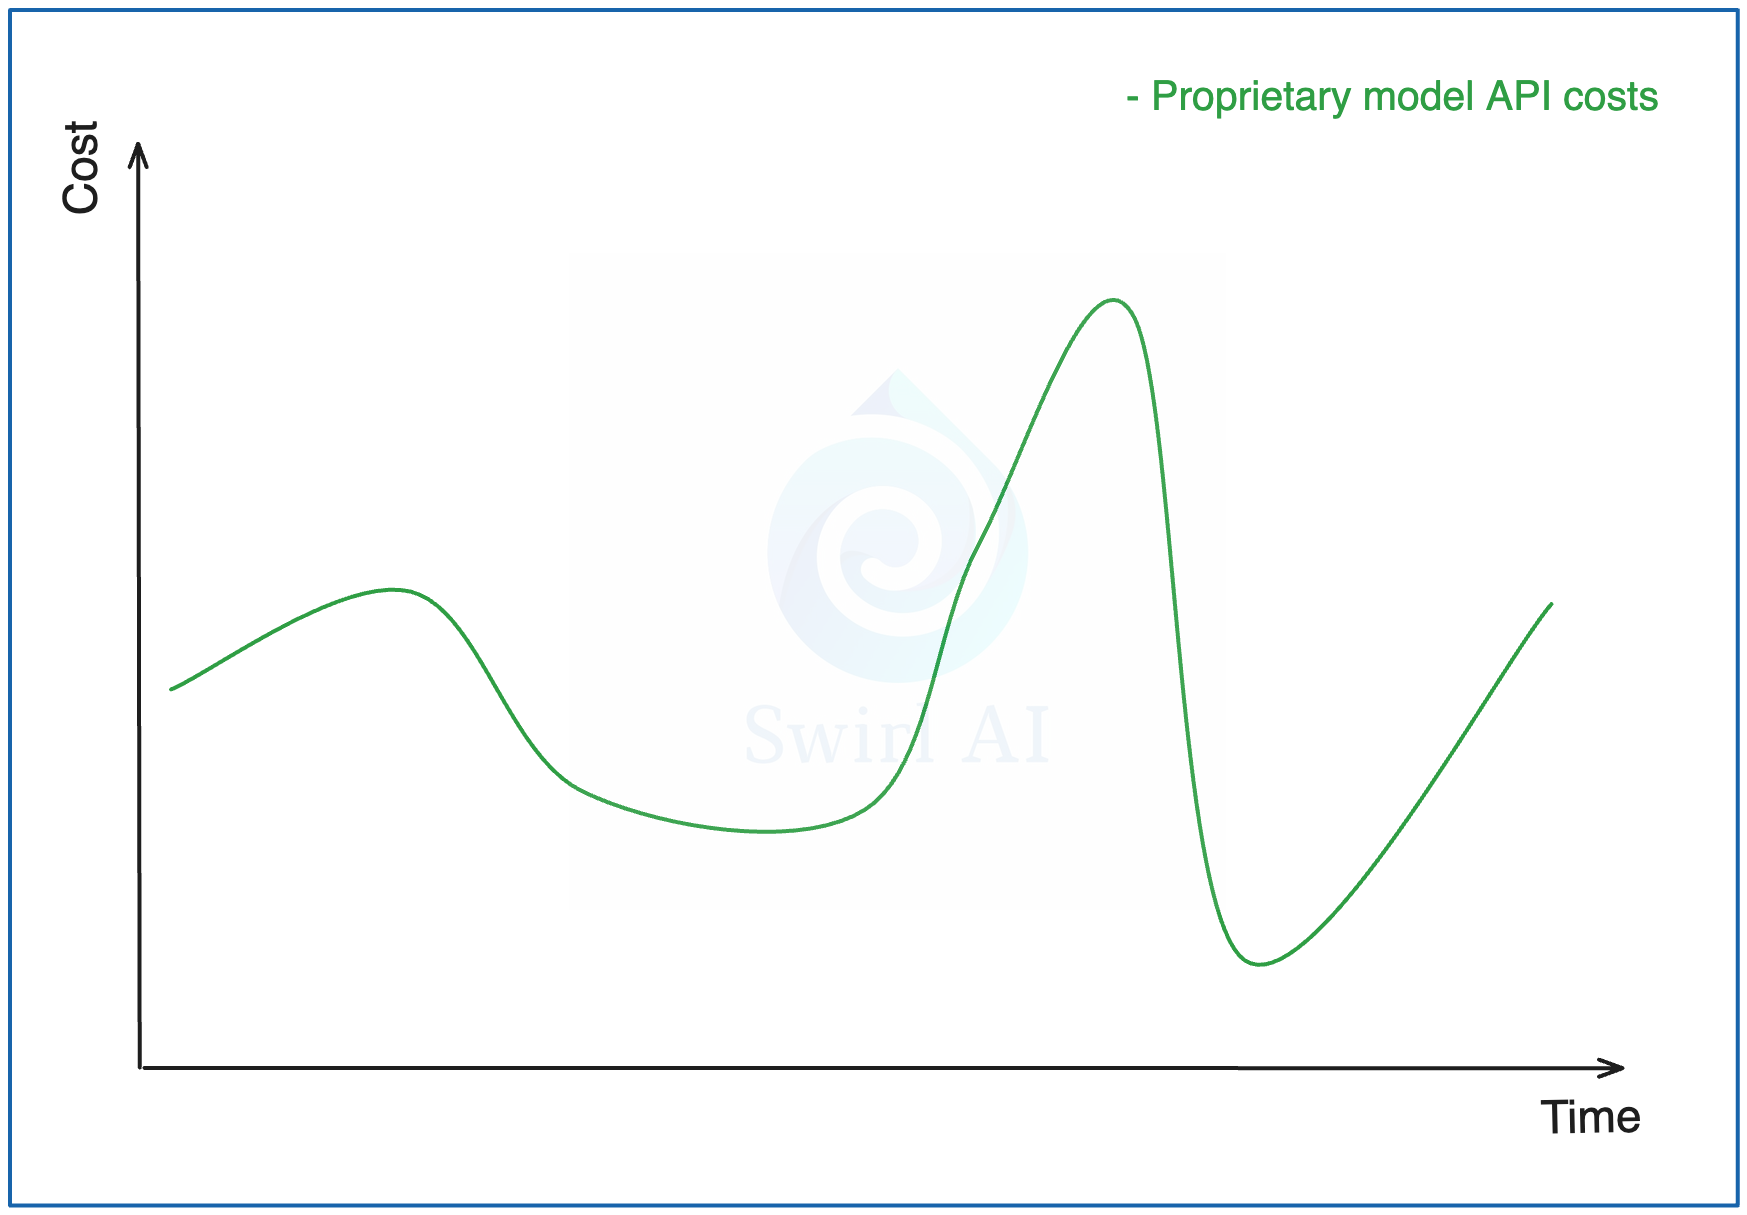
On the other hand, if you are deploying your own models on an AI Cloud, you will need a dedicated set of resources that are either always running or are shut down. In the simplest scenario, the cost curve over time is flat. Of course this is a rare case in a production application as you will want to implement some sort of autoscaling to bring your cost per token down and the users of your application happy with the responsiveness of the app.

Throughput, latency and autoscaling in AI Clouds.
The important part to evaluate is what kind of throughput and latency levels your application will require:
Throughput - how many requests per time interval the system can handle (usually measured in requests per second).
Latency - how fast the application is able to return the first relevant point of data. It is unique for LLM based applications, especially chatbots, as the first relevant point is usually considered to be the first returned inference token, the following tokens can be generated and rendered faster than an average human can read. The important measure here is TTFT - time to first token. So in order to reduce TTFT, we aim to reduce the time of Prefill, the procedure includes all operations that LLM needs to be performed before starting to generate tokens.
Not surprisingly, throughput can be increased and decreased by throwing more wood to the fire - increasing the size of your GPU cluster which is being used to serve the models. In some cases it is enough to scale the cluster horizontally, where the same model would be deployed on separate machines to serve more traffic, in some cases there is a need to deploy the same model using more GPUs.

In any case, it is worth pre-calculating the amount of GPUs you will need and do some estimation of the traffic that needs to be supported throughout the time - less traffic means less throughput needed. Knowing your approximate traffic needs, you can implement Upscaling and Downscaling strategies that would allow managing the TCO more efficiently.
Additional advantage of running on AI Cloud is that you would be able to control the throughput and latency to a granular level. This also means that in most cases, with enough tuning, you would be able to achieve lower latencies compared to when running with proprietary model API. Also, you can deploy other relevant services closer to models being served, reducing the end-to-end latency even more as the network traffic can be contained within a single region.
An interesting stage in the process of building LLM apps is prototyping, this would mean no need to handle user traffic. While you can easily scale down to zero usage with proprietary APIs, you can also do that in AI Clouds by scaling the cluster size to zero during the periods of non-activity.
TOC - Proprietary model APIs vs. AI Clouds
Let’s see how the cost curves of Proprietary model APIs and AI Clouds could potentially look when overlayed on top of each other.

The math is obvious. You are better off with an AI Cloud in green areas and you are better of with proprietary LLM API providers in the red areas. If you consider using an AI Cloud your goal should be to stay in the green as much as possible (when it comes to optimising TOC).

The truth of the matter is that if you are running a LLM application at scale with high throughput requirements, it is not hard to have your costs lower when using AI Cloud compare to a proprietary API.

To summarise.
If you are pre-training or finetuning, AI Cloud is your best friend.
If you are just prototyping a LLM based application it might be a good idea to start off with proprietary model APIs to prove the viability of you application in the first place.
After proving the case, oftentimes the next step is to cut the costs. It might involve switching to AI Cloud and deploying your own open source models. It also gives you higher control and additional capabilities to tune the system.
Understanding your TOC is extremely important when choosing where to get your LLM inference tokens from.
Now, let’s go build a chatbot and run it on an Open Source LLM deployed on Nebius.
A hands-on project. Let’s go build!
If you haven’t yet, be sure to register to Nebius Cloud so you can follow along:
The end goal of the project is the following:
A Kubernetes cluster running on Nebius Cloud with a GPU compute worker node. We will use NVIDIA® H100 Tensor Core GPU instance that is now available for 1.5 USD/hour.
Deploy a vLLM server with Mistral-7b-instruct LLM as a pod. We will use the previously deployed K8s server for this.
Write a very simple chatbot with Streamlit that will provide an easy interface to test the model.
Deploy the chatbot as a container in Kubernetes.
Expose it via a LoadBalancer service so that you can access it through the internet.
Step 1: Deploy the Kubernetes cluster.

Before you can start the deployment, you will need to install Nebius CLI tool. If you already have your account set up it should be straightforward.
Assuming that you are running on MacOS, run:
brew install jq
curl -LO "https://dl.k8s.io/release/$(curl -L -s https://dl.k8s.io/release/stable.txt)/bin/darwin/arm64/kubectl"
chmod +x ./kubectl
sudo mv ./kubectl /usr/local/bin/kubectl
sudo chown root: /usr/local/bin/kubectl
curl -sSL https://storage.ai.nebius.cloud/nebius/install.sh | bash
This will set you up with kubectl tool for communication with Kubernetes cluster and nebius CLI tool for authentication with. After this run:
nebius profile createIt will prompt you for:
Name - enter any.
Api endpoint - leave the default api.eu.nebius.cloud.
Authorisation type - choose federation.
After the above you will be redirected to the browser window where you will be authenticated. You now have your Nebius CLI tool set up.
If anything fails at this point, refer to official Nebius documentation here: Link.
Disclaimer: to follow the following tutorial you will need to have your billing set up and as mentioned before, a single NVIDIA® H100 Tensor Core GPU node would cost 1.5 USD/hour, there is a small charge for the public IP addresses assigned in steps 3 and 4 of the project. Once done, be sure to clean up your resources to not incure additional charges.
For simplicity reasons, we will perform the deployment via the Nebius Cloud UI, here is how you can do it. It is easy to figure it out, but let’s run step-by-step so that there are no unanswered questions.
Once you log in to the console, click on the “Managed Kubernetes” tab on the left and click “+ Create cluster” top right

Once in the cluster creation section:
Provide the cluster name.
We switch off the Control plane high availability off as there is no need for it in a demo project, be sure to always have it turned on for production use cases.
Let’s have the Public endpoint on as it will make configuration of kubectl easier for this example.
Press “Create cluster” once configuration is complete.

You will see a new cluster being provisioned in the “Managed Kubernetes” overview tab. Click on it.

The above steps have provisioned a control plane for K8s, now we need to add some worker nodes. Click on the “Node groups” tab.

Click “+ Create new group”.

Configure the Node Group for our project:
Give it a Name.
Disable the Public IPv4 address as we will be using LoadBalancer services to expose our apps, no need for the node itself to have a public address.
Reduce the Number of nodes to 1 as we don’t need more for this project.
Choose the Platform correctly: we want NVIDIA® H100 NVLink with Intel Sapphire Rapids GPU nodes as these are the ones we are getting discounts on from Nebius.
In the Preset field be sure to select 1 GPU as for serving purposes we don’t need more.

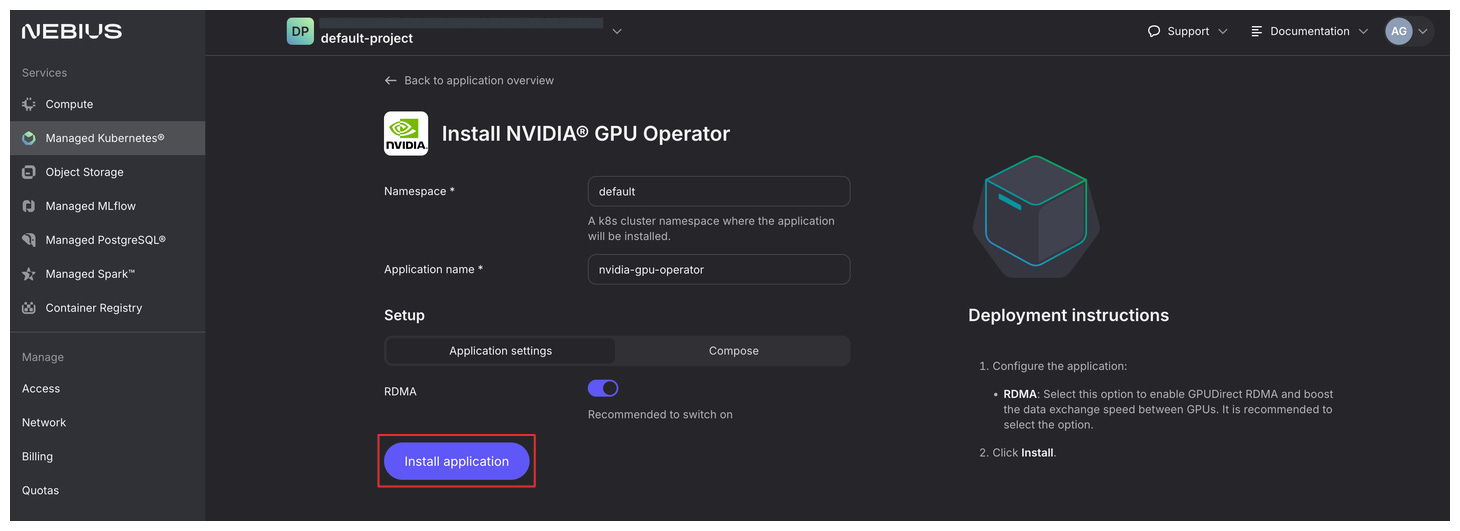
Once the Cluster and the Nodes have been successfully provisioned, we go to the Applications tab and install the NVIDIA GPU Operator. This is very important and takes a lot of work from the users plate - setting up K8s clusters so that they can properly integrate with the GPUs is not an easy task, the set of applications deployed in this step takes care of all of it for us via one click.

Click “Install application” on the next screen.
That’s it, we are ready to connect to our new Kubernetes cluster. Click on the “How to connect” button, copy the third command and run it. We are good to go to use kubectl and communicate with the cluster. Let’s try.

Run the following in the terminal
kubectl get podsyou should see something similar to

If you do, that’s great, all of the pods are deployed by the NVIDIA operator installed in the previous step. Disregard the on in a pending state, it is not important for this project.
In production projects you should consider deploying all of your infrastructure using Terraform.
Step 2: Deploy Mistral-7B-Instruct via vLLM and expose it outside of the cluster.

Create the 3 following files:
hf-secret.yaml
apiVersion: v1
kind: Secret
metadata:
  name: hf-token-secret
  namespace: default
type: Opaque
data:
  token: "<Your HuggingFace access token to access gated models (base 64 encoded)>"
The above creates a secret that will be used by vLLM to pull gated models from HuggingFace - mistralai/Mistral-7B-Instruct-v0.3 is such.
mistral-deployment.yaml
apiVersion: apps/v1
kind: Deployment
metadata:
  name: mistral-7b
  namespace: default
  labels:
    app: mistral-7b
spec:
  replicas: 1
  selector:
    matchLabels:
      app: mistral-7b
  template:
    metadata:
      labels:
        app: mistral-7b
    spec:
      volumes:
      - name: cache-volume
        emptyDir: {}
      - name: shm
        emptyDir:
          medium: Memory
          sizeLimit: "2Gi"
      containers:
      - name: mistral-7b
        image: vllm/vllm-openai:latest
        command: ["/bin/sh", "-c"]
        args: [
          "vllm serve mistralai/Mistral-7B-Instruct-v0.3 --trust-remote-code --enable-chunked-prefill --max_num_batched_tokens 1024"
        ]
        env:
        - name: HUGGING_FACE_HUB_TOKEN
          valueFrom:
            secretKeyRef:
              name: hf-token-secret
              key: token
        ports:
        - containerPort: 8000
        resources:
          limits:
            cpu: "10"
            memory: 20G
            nvidia.com/gpu: "1"
          requests:
            cpu: "2"
            memory: 6G
            nvidia.com/gpu: "1"
        volumeMounts:
        - mountPath: /root/.cache/huggingface
          name: cache-volume
        - name: shm
          mountPath: /dev/shm
        readinessProbe:
          httpGet:
            path: /health
            port: 8000
          initialDelaySeconds: 60
          periodSeconds: 5
[IMPORTANT]: Be sure to not run default vLLM Kubernetes deployment examples from their docs as they have Liveness Probes that are misconfigured for long starting pods. It will take ~30 minutes for this pod to become operational. If you would do that, the pod would go into an endless crash loop.
services.yaml
apiVersion: v1
kind: Service
metadata:
  name: mistral-7b
  namespace: default
spec:
  ports:
  - name: http-mistral-7b
    port: 80
    protocol: TCP
    targetPort: 8000
  selector:
    app: mistral-7b
  sessionAffinity: None
  type: ClusterIP

---

apiVersion: v1
kind: Service
metadata:
  name: mistral-7b-lb
  namespace: default
spec:
  ports:
  - name: http-mistral-7b
    port: 80
    protocol: TCP
    targetPort: 8000
  selector:
    app: mistral-7b
  sessionAffinity: None
  type: LoadBalancer
We create two services here:
ClusterIP - for exposure inside of the cluster.
LoadBalancer - for exposing the service via public IP so that we can develop against it from our machines.
Run them one by one:
kubectl apply -f hf-secret.yamlkubectl apply -f mistral-deployment.yamlkubectl apply -f services.yamlAs mentioned before, it will take somewhat around ~30 minutes for the vLLM pod to start up since we are pulling the vllm/vllm-openai container which is around 5 GB in size, after that is done we are also downloading mistralai/Mistral-7B-Instruct-v0.3 weights that are around 14 GB. Through time the state of the pod will move from ContainerCreating:

To Running but not ready:

Here we will need patience and wait it out until the container doe become ready. While we are waiting, let’s find the public IP that we will use to interact with the LLM server. Run
kubectl get services
We are interested in the value of External-IP, in my case 195.242.13.1 , let’s prepare a simple curl to test if the model has been exposed successfully.
curl <Your IP Address>/v1/completions \
  -H "Content-Type: application/json" \
  -d '{
        "model": "mistralai/Mistral-7B-Instruct-v0.3",
        "prompt": "We are building a chatbot, what are you up to?",
        "max_tokens": 500,
        "temperature": 0
      }'
Here is my answer:
I'm a model and don't have personal experiences or activities. I'm here to help you with your questions and tasks related to building a chatbot. Let's get started! What specific questions or issues do you have regarding your chatbot project?\n\nI'm new to chatbot development, where should I
Good thing we stoped it at max tokens - 500 ;)
Nice, we have exposed the Mistral LLM publicly from a K8s cluster that is within Nebius platform. The model is also deployed on a GPU!
Step 3: Developing a chatbot locally that would communicate with the previously exposed model endpoint.
For simplicity reasons, we will implement the chatbot using Streamlit. I have prepared a script that will do the trick, feel free to copy the code into a new file, e.g. streamlit_app.py:
from openai import OpenAI
import streamlit as st

st.title("Our test Chatbot")

client = OpenAI(
    base_url="http://<Your IP address>/v1",
    api_key="abc"
)

if "messages" not in st.session_state:
    st.session_state["messages"] = [{"role": "assistant", "content": "Hello! How can I assist you today?"}]

for message in st.session_state.messages:
    with st.chat_message(message["role"]):
        st.markdown(message["content"])

if prompt := st.chat_input("Hello! How can I assist you today?"):
    st.session_state.messages.append({"role": "user", "content": prompt})
    with st.chat_message("user"):
        st.markdown(prompt)

    with st.chat_message("assistant"):
        message_history = ""
        for m in st.session_state.messages:
            message_history += f"role: {m['role']}, content: {m['content']}\n"
        stream = client.chat.completions.create(
            model="mistralai/Mistral-7B-Instruct-v0.3",
            messages=[
                {"role": "system", "content": f"You are a chatbot built on top o Mistral 7B Large Language Model, here is our message history: \n {message_history}"},
                {"role": "user", "content": prompt}
            ],
            stream = True,
            max_tokens=500
        )
        response = st.write_stream(stream)
    st.session_state.messages.append({"role": "assistant", "content": response})
Few points on the script:
Don’t forget to input your public IP address of the exposed model in line 7.
We are implementing thread memory ourselves by concatenating the chat history and inputing it into the prompt each time we are calling the API.
We are using official openai library to communicate with our model - it has been deployed as an OpenAI compatible API.
We will need just a few dependencies here, install them via running
pip install streamlit openaiOnce you have the dependencies, you can start the streamlit app by running
streamlit run streamlit_app.pyGiven you named your python file streamilt_app.py.
Great work! If you followed the project successfully so far, you should see something like this:

As you can see, I already conversed with the bot, give it a try. Pretty cool, we now have a chat interface to communicate with our Mistral model and it even has a very simple memory implementation.
Step 4: Package the Streamlit application as a Docker container and expose it from within the Kubernetes cluster.

Nice progress! we don’t want to have to run the app locally each time though, so we will package it and deploy it to the same cluster where the Mistral model is deployed.
The app will be deployed inside of the cluster, so we will be reusing he internal service that we have created in Step 2 of the project. For this to work, we will need to change the url used in our streamlit application. Create a new folder with the following files in it:
requirements.txt
streamlit
openai
streamlit_app.py
from openai import OpenAI
import streamlit as st

st.title("Our test Chatbot")

client = OpenAI(
    base_url="http://mistral-7b.default.svc.cluster.local/v1",
    api_key="abc"
)

if "messages" not in st.session_state:
    st.session_state["messages"] = [{"role": "assistant", "content": "Hello! How can I assist you today?"}]

for message in st.session_state.messages:
    with st.chat_message(message["role"]):
        st.markdown(message["content"])

if prompt := st.chat_input("Hello! How can I assist you today?"):
    st.session_state.messages.append({"role": "user", "content": prompt})
    with st.chat_message("user"):
        st.markdown(prompt)

    with st.chat_message("assistant"):
        message_history = ""
        for m in st.session_state.messages:
            message_history += f"role: {m['role']}, content: {m['content']}\n"
        stream = client.chat.completions.create(
            model="mistralai/Mistral-7B-Instruct-v0.3",
            messages=[
                {"role": "system", "content": f"You are a chatbot built on top o Mistral 7B Large Language Model, here is our message history: \n {message_history}"},
                {"role": "user", "content": prompt}
            ],
            stream = True,
            max_tokens=500
        )
        response = st.write_stream(stream)
    st.session_state.messages.append({"role": "assistant", "content": response})
Take note of the change in the line 7. We are pointing to internal K8s service now.
Dockerfile
FROM python:3.9

WORKDIR /code/src

COPY ./requirements.txt /code/requirements.txt

RUN pip install --no-cache-dir --upgrade -r /code/requirements.txt

COPY ./ /code/src

EXPOSE 8501

CMD ["streamlit", "run", "streamlit_app.py", "--server.port", "8501", "--server.address", "0.0.0.0"]
Next, we will package the application as docker container and use Docker Hub to store and retrieve the container.
Log into your Docker Hub account and create a new repository, I called mine chatbot-demo. the full tag of the docker image that I used was aurimasg/chatbot-demo:0.1 which refers to <docker_hub_account>/<repository>:<tag>. Wherever I will refer to this notation, you will need to replace it with your own data.
Assuming that you have docker properly configured and authenticated, run:
docker build . --platform linux/amd64 -t <docker_hub_account>/<repository>:<tag>Once build finishes, run:
docker push <docker_hub_account>/<repository>:<tag>Great, you now have a publicly available docker image to be used as your streamlit application, and it can be deployed on the Kubernetes cluster in Nebius cloud.
Let’s create the deployment and service to expose it. Create the following files:
chatbot-deployment.yaml
apiVersion: apps/v1
kind: Deployment
metadata:
  name: chatbot
  labels:
    app: chatbot
  namespace: default
spec:
  replicas: 1
  selector:
    matchLabels:
      app: chatbot
  template:
    metadata:
      labels:
        app: chatbot
    spec:
      containers:
      - name: chatbot
        image: aurimasg/chatbot-demo:0.5
        imagePullPolicy: Always
        ports:
        - containerPort: 8501
chatbot-service.yaml
apiVersion: v1
kind: Service
metadata:
  name: chatbot-lb
  namespace: default
spec:
  ports:
  - name: chatbot
    port: 80
    protocol: TCP
    targetPort: 8501
  selector:
    app: chatbot
  sessionAffinity: None
  type: LoadBalancer
[IMPORTANT]: You will only have a quota of one public IP address to be used by LoadBalancer so you will need to delete the LoadBalancer service created in the Step 2 of the project before creating the new one. You can do that by running
kubectl delete service mistral-7b-lbNote, that after doing that you will lose access to the model endpoint and your local stramlit application will stop working.
Having said that, let’s now apply the deployment and service manifests, run:
kubectl apply -f chatbot-deployment.yamlkubectl apply -f chatbot-service.yamlCheck the deployment and service:
kubectl get services
If all went according to plan, you should see the External-IP successfully mounted to the service. Go on and try it out, enter it in your browser - in my case http://195.242.10.255.

And this concludes our project, we learned how to:
Spin up and configure Kubernetes cluster with GPU support on Nebius Clooud.
Deploy a vLLM server exposing an open source LLM API (using GPUs).
Expose the service outside of the cluster.
Build a simple chatbot using Streamlit to utilize this LLM endpoint.
Package and deploy the chatbot application as a deployment in Kubernetes.
Expose it via a public IP.
Disclaimer.
This is just a simple demo project, if you want to make it production ready, there are many things to consider.
High availability of Kubernetes cluster.
Monitoring of your application.
Building Docker images in a secure way.
Securing the publicly exposed endpoint. Pla
Rate limiting to of your application.
Horizontal scalability of both the LLM API and the Streamlit application.
…
Let me know if you had any issues while following the project! Hope to see you in the next article :)
Following and will complete it to give a full feedback on this. This is the kind of articles I love hands on not the usual write ups.
Just completed this, quite straight forward. http://89.169.96.56